Textr Help Center
Post Category
Related Posts
-
Textr Team New Updates for iOS 1.0.7
-
Announcement for Textr eSIM Lucky Draw Winners
-
Terms of Use About Textr eSIM Credit
-
Novel AI: How Can It Improve Your Business Writing
-
Be Sure to Know These Before Buying Luxury Motors
-
Textr Team New Updates for Payment Method
-
iPhone 14 eSIM: What Does It Mean to You
-
Get CRM Software to Improve Your Business
-
Frequently Asked Questions About Sending SMS and MMS
-
New to Hockey? Here’s What to Expect
Home » Textr Team » Help Center » Contacts »
How to Add and Assign a Tag
Laura Liang
Content Editor and Customer Support at Textr
Published Jan 10, 2022
Sorting and Categorizing Your Contacts
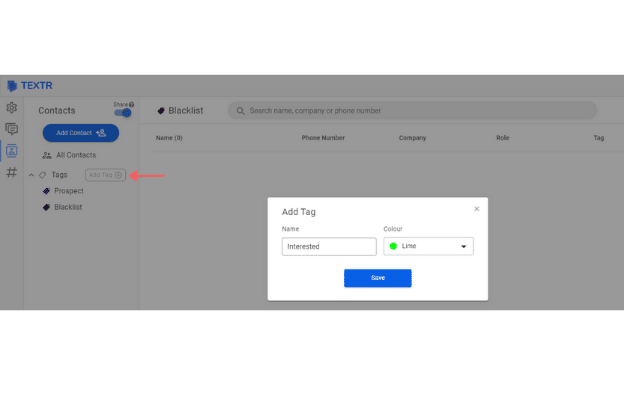
- Navigate to the ‘My Contacts’ in the Textr Team menu. Under ‘Contacts’ you will see the subcategory ‘Tags’. Click ‘Add Tag’.
2. A pop-up will appear prompting you to input the tag name and assign a color to it. Click the blue button ‘Save’ to finish creating your tag.

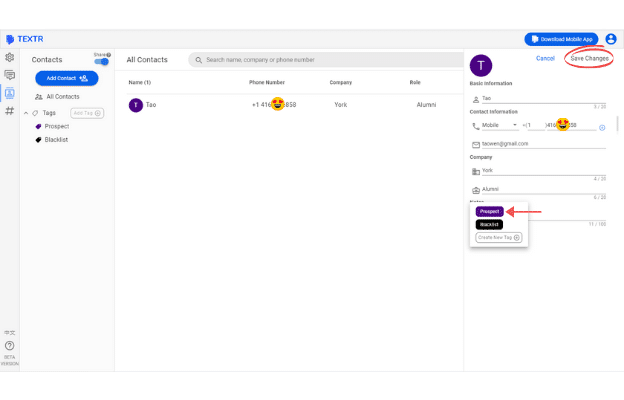
3. Next, find the contact you would like to add a tag to. You can scroll through your list of contacts or use the search function. Click on your chosen contact and click on ‘Edit Contact’ represented with a pencil icon.
4. Now, you can edit the contact’s information including tags. Click ‘Add Tag’ and you will be presented with the option to choose which tag to assign to the contact. Select your chosen tag and hit ‘Save Changes’.

5. You’re done! This contact will appear when you select a tag that the contact is assigned to.
